Tuesday 6 May 2014

Simple Genoese Sponge

While deciding what sponge to use as the base of a birthday cake, I did a bit of experimentation. I've never made a Genoese sponge before so decided to give it a go. Overall it was quite simple and the cake was light and really spongy. It's not dense enough to support the weight of the fondant I'd need to cover it with for my birthday cake but it makes a really nice light sponge for making a cake for afternoon tea or something. I topped it with lemon curd and fresh blueberries but you really could use anything. There's only one of the two layers in the photos because half of it was eaten warm from the oven with Nutella and custard. That's less sophisticated but so so tasty! 


Ingredients
50g melted, cooled butter
120g plain flour
Pinch salt
4 eggs (if you can, use duck eggs or substitute one in for a hens egg)
120g caster sugar 

Method
1. With a little of the melted butter, grease two sandwich tins.
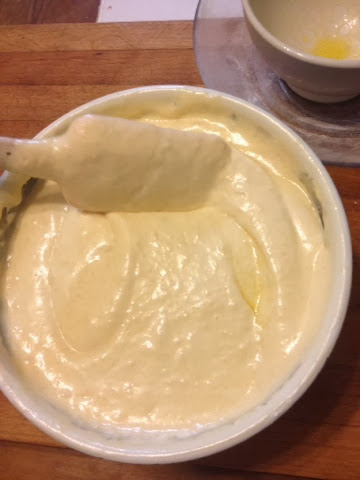
2. In a bowl over hot water, whisk the eggs and sugar with an electric whisk for about 10 minutes until thick, pale and creamy and at least tripled in size.

3. Remove from the heat and fold in the flour in two batches, followed by the butter. 

4. Divide between the two tins and bake for 20-30 minutes at 170 degrees Celsius until golden and a skewer inserted into the middle comes out clean. 

To finish top with lemon curd and fresh blueberries and then dust with icing sugar. I did take a picture but it seems to have vanished from my phone while all the rest have stayed... mystery! It's really versatile so you really could top it with whatever you wanted. My brother wanted a Nutella one so instead of having two layers of sponge I had one of the cakes topped with lemon curd and blueberries and the other with Nutella and fresh strawberries. Give it a go! 

Tips
-Use a much bigger bowl than you think you need for the eggs and sugar- you'll be surprised how much the mixture expands! 
-Don't be impatient with the whisking - it'll go really thick and creamy and leave a trail when you pull the beaters out of the mixture. 

Almond, Berry and Seed Breakfast Muffins

I saw a recipe somewhere for muffins like these but decided to tweak them a bit. They taste really good and they're way better for you than the muffins you buy from Starbucks on days when you're running too late for breakfast. I made a full batch of 12 then froze some so that when I needed to take one with me I just took it out of the freezer and by the time I got hungry it had thawed out. They keep for a couple of days in an airtight box anyway as they're full of fruit. They're so simple to make and even trick you into thinking you're eating real cake! They also only take 30 mins start to finish and 25 of those are when they're in the oven!

Ingredients
1 cup self-raising flour
1 pot (about 280 ml) buttermilk
1 cup ground almonds
2/3rds cup caster sugar (or muscavado unrefined sugar if you have it)
3tbsp seeds (I used half chia seeds and half flax seeds, Amazon sells them cheap)
1 large egg
1/4 cup olive oil
1 cup berries (I use frozen mixed berries) 
1 tsp cinnamon
1/2 tsp nutmeg

Method
1. Put all the dry ingredients in a bowl.
2. Mix the oil, buttermilk and egg in a jug.
3. Add the wet to the dry ingredients and mix until incorporated.
4. Fold through the berries.
5. Divide between 12 muffin cases in a cupcake pan.
6. Bake at 170 degrees Celsius for about 25 minutes until a skewer comes out clean when inserted.
7. Leave to cool on a wire rack. 


Tips
- I topped mine with a sprinkling of porridge oats before baking to give some extra crunch to the top
- Use wholemeal flour if you want them to be even healthier
- Try mixing it up with different fruits and seeds as they're really versatile! Pumpkin seeds and apricots would be amazing... you could even add some white choc chips if you wanted them to be a little bit naughty!! 

Happy baking :) 

Salted Caramel and Peanut Millionaires Shortbread

I love millionaires shortbread but find it too sweet. This is a great way of making it less sickly. However, it does mean that you can eat more of it and are entering dangerous territory if trying to embark on a diet! I used salted peanuts in this recipe instead of salting the caramel to add constrast so that there's parts that are really salty and parts that are really sweet from the caramel. I like it that way but by all means just salt the caramel and leave out the nuts.

Ingredients
75g caster sugar
115g butter
200g plain flour (or 175g plus 1tbsp corn flour)
1 pinch salt

Caramel:
100g butter
100g light muscavado sugar
1 tin consensed milk 

150g dark chocolate

Method
1. Mix the butter and caster sugar until combined and resembling breadcrumbs. 
2. Add in the flour and press into a 20cm tin.
3. Bake at 150 degrees Celsius for about 30 minutes until golden. 

4. For the caramel, melt the butter and muscavado sugar together over a low heat. 
5. When combined, add the condensed milk, bring to the boil and stir continuously until the caramel is thick and coats the back of the spoon. As a test, dip in a cold teaspoon and if the caramel firms up and sets very quickly, it's good to go.
6. Pour the caramel over the biscuit and allow to firm up and cool.
7. When cool, top with the melted dark chocolate and allow to set. 


Tips
Make the caramel really thick. Be patient with it as it'll get there, it may just take a while. You should be able to drag your spoon from one side of the pan to the other and the line you've just drawn on the bottom of the pan to be still visible. This'll allow for an easily sliced caramel rather than having it too gooey and messy when trying to divide it up.
Cut through the chocolate when it's slightly soft so just before it sets otherwise it'll crack and you won't get uniform little squares. If it's set hard, dip your knife in hot water and divide up the chocolate first before cutting all the way through the shortbread. 
Try adding nuts to the base if you don't want to add them to the caramel (use unsalted though) for extra crunch but keeping the smooth caramel.